Saturday, December 4, 2010

Altered Book Fun.......

I just finished two altered books, one will be a Christmas gift, the other is for me! 

This one is mine and it was a fun project that I have worked on, one page at a time, whenever  the mood struck over the past year.  The book base is a dollar store photo album's cardboard pages.

Opening page.....

altered book 008

Page 1...A gesso painted page with sheet music, piece of cardboard, photo, ribbon and postage stamp.

altered book 027Pages 2 and 3

altered book 009Page 2.....when cars were king!

altered book 011   Page 3......it's juice time!

altered book 013

Page 4.....I dream in French on an old ledger page!

altered book 014Page 5...."All nature is but art unknown to thee"!

altered book 016 Pages 6 and 7.....

altered book 017 Page 6....Birds eggs and postage stamp!

altered book 018Page 7....My great-grandmother and friends picnicking in Norway!

 altered book 019

Pages 8 and 9............with a half-page between.

altered book 020Page 8....Dragonfly on sunflower stamped page with a touch of cardboard and a small stick!

book cover 020 Front of half-page...paper and lace!

book cover 021Other side of half-page...tickets and hand overlay!

altered book 021  Page 9....The working woman is a force of nature!


altered book 024Pages 10 and 11.........

altered book 023Page 10....Seed packet and a real dried pansy!

altered book 025Page 11....Girls who wear glasses with cloth and paper!  

book cover 016Last page, page 12.....watercolor and ribbon roses!

book cover 017In this case, I am not going to alter the cover of this book, I like it as it is, and I think it works with art that is inside.  I may decided to add some flourishes later but for now......I really like this worn, faded blue cover bound together with metal rings!


book cover 018   Hope you enjoyed viewing, as much as, I enjoyed creating!

Tuesday, November 30, 2010

Random Thoughts on a Rainy Day!

Today has been one of those dark, pouring down rain all day, kinda' days!  The kind of day where you slow down a bit and, maybe, take some time to reflect on your surroundings.  I did a bit of that today.

I don't know if you have favorite objects or spots in a room, but I do.  A place that when you look at it, it just make you feel good, in a warm fuzzy, satisfying sort of a way.  I, also, have plenty of place that are "off", just not warm, fuzzy or very satisfying!

But, I want to address a couple places that I like to look at in our living room.

They may not resonate with everyone, but for me, it's this IKEA chair with the quilt throw over it and the baking soda can and bird nest accessories on the table.....just make me smile. Normally, I don't even like throws over chairs but this was a happy accident.

book cover 002


Bright light or.........


book cover 003


or dim,

it just feels cozy and comfortable to me.

My favorite place to sit is on the sofa, the photo above is on one end of the sofa and on the other end is another table with this sitting on it..............

book cover 004


two black metal document boxes but, it's what is on the other side of the boxes, that I love looking at....it is the cover of a book about the Civil War with lavender blooms sprouting above from a pot sitting on the other side of the book.

It's the colors that I love.


book cover 005I know that the combination of purple and orange is an acquired taste but it is my all time favorite color combo. 

This was another happy accident, that I discovered one day, when I just looked over my shoulder and noticed the book jacket colors with the "not so real" lavender on the other side complimented each other. It was another feel good moment for me. 

I love the fact that we are all have such different taste. What is one person's pleasure might be difficult for another person to appreciate but isn't it fun!

I try to surround myself with the things I love which are usually, pretty simple and worn objects and furniture.....texture and color are what make my world spin!

Thanks for stopping by please leave a comment I love to hear from you.

I am linking to Sue's Rednesday, come with me to visit the other blogger's red message.

Monday, November 29, 2010

30 Years and counting........


wedding On November 30, 1980, hubby and I were married in a small Lutheran Church in Oregon.  We had both been married before and hadn't know each other very long but we were off to face the world together.

It hasn't always been easy or fun, but we have plowed through the tough times and coasted through the good ones, built our life together and watched our family expand.....all the while loving and supporting each other!

wedding 002

We still laugh at each other's jokes and enjoy each other's company.  We've taken care of each other in sickness and health, for richer and poorer and we appreciate God's having granted us this time together.  We are thankful for our good health, our family, home, friends and our "fur babies".

10963_1265920092336_1359804254_30753270_8380959_nThank you for the best 30 years of my life, sailor!

"Grow old along with me....the best is yet to be"

Tuesday, November 23, 2010

A needlessly slow process.......

blue 005

About 12 years ago, back when we still had an space in a local antiques mall, I bought this baby.  I found it at a yard sale......all painted white with lines and hardware that made me believe it was something out of the 1970s.

blue 007Shortly after I brought it home, hubby went to work and stripped the white paint.......well, most of it.....being something of a perfectionist he was discouraged by the amount of paint left in crevices and grooves and the grain of the wood.

By then, we realized it was not a 1970s piece but much earlier.....on the bottom of one of the drawers, we found the name of the furniture maker, JJ Cady, and the date May 1919.  On top of which, the doors held beautiful old, old wavy glass full of bubbles.

In spite of her virtues, she sat in our garage partially disassembled, partly stripped and gathering dust.  The discouraged owners not sure how they wanted to proceed.

Then our granddaughter, and her husband, thought they would like to have a china cabinet/secretary (note: the fold out shelf) and they would finish it........well, five years later.....it was back in our garage, same sad state with more dust.

Then one day I sent a photo to a dealer friend, sure! she would like to buy it!  Ooops, then second thoughts began to set in.

Did I REALLY want to sell it?  Come to think of it, there really wasn't that much left to do to finish it and where would I find another china cupboard for that price. 

So, with my newly found motivation I went to work.  I scrubbed off the grime, applied finishing wax and painted the inside.........here she is in all her glory!

china cabinet 004I still need to go to the glass shop and order a couple shelves....but what quality and character, even with a few specks of white paint still in place.  It is a perfect rustic piece for our house. 

I will decorate the shelves and, then, I'll share the finished product...soon...well sooner than 12 years, I'm pretty sure.  Geez, I may be the QUEEN of Procrastination!!!!

Have a wonderful Thanksgiving!  I have so much for which to be thankful....a wonderful family, our health and a our fun and busy retirement.  Blessings from our house to yours.

I know it's a stretch but, if you look close, there was some red paint under the white paint originally and it shows in the first photo....so, I'm taken my cabinet to show it off at Sue's Rednesday.  Also, found two new and really fun Linky Parties at Restore Interiors "Restore It Wednesday" and Primative & Proper's "Piece of Work Wednesday".

Sunday, November 7, 2010

Hip, Hip Hooray for Rose Hips!

By now, most of you know I love my garden and flowers and one of my favorite parts of fall is drying flowers!

This year I've dried a bunch of hydrangeas, that I have not put to much use, as of yet.  Think I'm going to make a wreath or my just give them to family and friends for bouquets.

I blogged a while back about a mixed bouquet of flowers, from the garden, that I dried.

This week, I scored a BUNCH of dried rose hips. 

In this part of Oregon, wild roses can often be seen growing in fence rows and ditches along country roads.  Just so happens, this year I spied a small bush in front of my son's place BEFORE somebody cut the whole thing down or the highway department had sprayed it with weed killer. 

So, sweet son that he is, he went out and cut this for me......trust me, this is a leather gloves and long sleeves job.....they are prickly "critters".

rose hips 001You may remember that I placed a white enamel pitcher full of dried Hydrangeas and a bunch of Dollar Store Eucalyptus on the front porch for my fall redo, recently.

Well, even if there is no sun the UV rays will take the color out of everything, including dried Hydrangeas, very quickly.

rose hips 003The Hydrangea faded to tea color but the Eucalyptus kept it's color because it was dyed, not natural, blue!

So, I tossed the faded Hydrangeas, saved the Eucalyptus and filled the pitcher with rose hips and the recycled Eucalyptus!

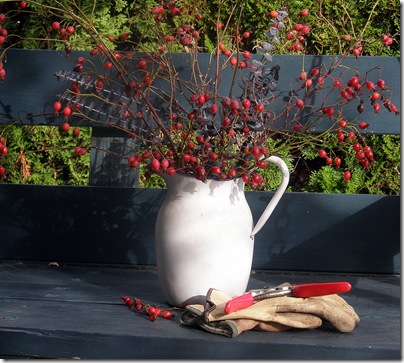
rose hips 009 rose hips 006rose hips 012 Then I had some fun moving the pitcher full of rose hips around the yard and taking pictures....we lucked out and have had another beautiful sunny Sunday, take advantage of it, I say!

rose hips 011  Jack dog feels a need to give an opinion on every subject and be close at hand in case there are questions!  You can never have too much help!

rose hips 014  One more photo op....love all the textures surrounding the white enamel pitcher sitting on a weathered log.

Finally, the pitcher full of rose hips and Eucalyptus is back on the front porch......adding a nice touch of fall color!

rose hips 016Looking at this photo, I think I am going to add some more branches to fill in a bit more....otherwise,  it's a nice welcoming touch of color.  The house is really green,by the way, not as blue as this photo looks.

So, here's where the rest of the rose hips ended up!
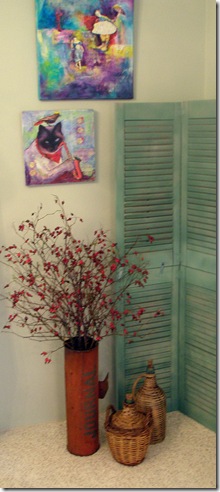
rose hips 2 002  In the corner of the dinning room under some of my art work.  Do you know what the container is, she asks????

In a its former life, it was a newspaper box, do you remember when they were metal, not plastic and were attached to the side of your house.

Back in the day, Portland, like many big cities,  had TWO daily newspapers, one in the morning and one in the afternoon.  This box was for the Oregon Journal that was delivered every afternoon.  I was going to look up the year it went out of business, but didn't, so I am guessing the 1960s. 

This is a nod to my newspaper days, I worked for weekly papers for 25 years.

rose hips 2 004 Again, I love all the texture....orange red rose hips in the  rusty, faded orange metal paper box, wicker and shutters! 

I'd like to tell you the fuzzy, out of focus photo was done on purpose, but you wouldn't believe me any way, oh well!  You get the idea.  Hope you enjoyed.

I haven't blogged for a couple weeks so I've missed the parties....today I headed to Metamorphasis Monday,  Tabletop Tuesday, Rednesday.  Gather more ideas for using trimmings from your yard for unique decor at  An Oregon Cottage's Tuesday Garden Party

Thanks for stopping by.....I would love it if YOU became my 100th follower! 

Sunday, October 31, 2010

12 Days of Christmas Swap!

Recently, I joined an on-line group called ABC (Altered Book Club), to learn more go HERE.

The idea is to learn from other artists who love playing with paper, creating collages, cards and other fun crafty things.  Wow, is there a lot of talent out there.

I am excited to be participating in my first EVER swap with the "12 Days of Christmas" theme.   For those of you who don't know what this type of swap is, it is best described as; twelve people making twelve 5 x 5 cards that represent ONE of the 12 days of Christmas song.  We then mail them to one person, who will in turn, mail back to each of us, a set that represents all twelve days.

Cool, huh? 

I've always wanted to do this and I am so looking forward to receiving beautiful, handmade cards created by some very talented artists.

When I receive mine, I will share them with you (should be around Dec. 1) in the meantime this is the wrapping for my card......which was "Two Turtledoves"!

etc. 014 I put each card in a cellophane bag and then glued a piece of sheet music, a piece of red paper and a white piece stamped with a bird cage and decorated with two little birds, cut out using a Cricut.

PA100001 Voila! Two gift wrapped Turtledoves!

Tuesday, October 26, 2010

No Bake Cupcake..........

For the last five years I have had the pleasure of participating in a fun and successful Holiday Art Show and Sale in the historic little town of Aurora, Oregon. This show is sponsored and organized by the members of the Aurora Art Association.

This year's event is scheduled for Saturday and Sunday, Dec. 4 and 5 with a Friday night artist reception.

However, I have been a bit of an "art slacker" this year.  so I've got to get busy.......sooooooooo I started mixing up a batch of "no-cal" cupcakes, like these.......

Christmas  01 015

Pretty cute and pretty easy.....want to try one?

All you need is a Bingo card, or cardstock or watercolor paper.  These cards are about 5 inches by 6 inches in size. If you are cutting your own card, I would suggest 5 by 7 inches, then it will fit into an 8 by 10 mat and frame, when you are finished and ready for framing.  It is always good to go with standard sizes, when you can, it makes life easier.

Christmas  01 009Dilute watercolor or acrylic paint and apply a wash in your favorite color or colors.  Let them dry.

Christmas  01 010Then cut out the cupcake cup shape out of scraps of scrapbook papers or other paper.  The frosting top is best described as "cloud-shape".  Glue down the cup and add the frosting using Modge Podge, a glue stick or whatever adhesive you have on hand.

Cut out a small red cherry, to add to the top.  I drew a black stem on the cherry with a black fine tip pen.

Christmas  01 011Now, just for fun, use a crayon or artist's oil pastels (which I used) to outline the cupcake and add some doodles.  Then, if you like, add a word, or a sticker or rub-on at the bottom.  For sure, a sprinkle or two of glitter would add a great touch, too.Christmas  01 012  Because of the odd size of mine, I glued a piece of red paper, cut slightly larger than the bingo card, to the back.  Then I glued that to a piece of heavy white paper for framing.  Otherwise, I would have to cut my own, or pay someone to cut a mat for each one.

That is why I recommend using a 5 by 7 piece of paper, then you can buy a standard 8 by 10 mat and slip it in a frame and you're DONE!

How's that for fun and easy!  Make a cute inexpensive gift for a friend!

Join me at  Sue Loves Cherries Rednesday to read how other bloggers are using their "red".  For the first time I am, also linking to Vintage Thingie Thursday and Southern in my Heart's Inspiration Friday.  

Thanks for visiting, please come again and remember I love comments and followers.